Real-time host in oVirt
19 Sep 2016Introduction
With VFIO and SR-IOV, virtualization is now capable of delivering network bandwidth and latency comparable to bare-metal machines. To exploit this in latency sensitive environment such as NFV, real-time (RT) operating system is required. oVirt does not really have an concept of RT hosts and guests at the moment, I was wondering whether it is possible to have such host nevertheless. As it turns out, with a bit of tweaking and hacking, it’s possible!
PoC Setup
The following post was done with the help of my workstation:
- Asus Z10PE-D8 WS
- Intel(R) Xeon(R) CPU E5-2650 v3 @ 2.30GHz
- 64 GiB RAM
- 2x NVIDIA Corporation GM107GL [Quadro K2200]
- NIC #1: Intel Corporation I210 Gigabit Network Connection
- NIC #2: Intel Corporation 82576 Gigabit Network Connection
It’s not proper RT system but rather generic VFIO/SR-IOV/GPU assignment development machine.
BIOS Setup
Our first step into the RT world should be the BIOS. To eliminate latency spikes, our main objective is to heavily reduce the amount of non maskable interrupts (NMIs). Unfortunately, as BIOS isn’t anywhere near standardized, this is highly hardware dependent step. In ideal world, we would consult the manufacturer for recommended RT settings. For our small test setup, it should be enough to disable power management, SMIs and various CPU power saving modes.
To track our progress in BIOS tuning, there is a tool called hwlat consisting of kernel module and python script. We can use the python script to try to detect SMIs and judge their effect on RT operation.
hwlatdetect --duration=60 --threshold=10 --report=smi.txt
hwlatdetect:  test duration 60 seconds
   parameters:
        Latency threshold: 10us
        Sample window:     1000000us
        Sample width:      500000us
     Non-sampling period:  500000us
        Output File:       smi.txt

Starting test
test finished
Max Latency: 19us
Samples recorded: 60
Samples exceeding threshold: 61
sample data (60 samples) written to smi.txt
I have to admit that the “Samples recorded” and “Samples exceeding threshold” slightly puzzle me. That being said, 19 µs seems like reasonable latency ceiling.
RT Verification
The hardest thing to consider while working with RT OS is verifying whether the OS really is RT. Luckily, there is a tool that somewhat eases this process - cyclictest. From usage perspective, we need to run cyclictest for some amount of time (I’m using 15 minutes as this is a PoC, longer time may help discover additional latency spikes). The following command was used to run cyclictest on my host & guest.
cyclictest -m -n -v -p 95 -h 60 -n -i 200 -D 15mThe output of cyclictest itself shows minimum, average and maximum latency. Such information is great for a quick glance, but to get more in-depth understanding of how is the system behaving, it’s good idea to plot the data. Below is a script generate-plot.sh that generates plot (using gnuplot) of each file given as an argument.
$ cat generate-plot.sh
for file in $@; do
    tail -n $(($(wc -l guest | awk '{ print $1 }') - 3)) $file > tmp.1
    head -n $(($(grep -m 1 -n "# Histogram" tmp.1 | cut -d : -f 1) - 1)) tmp.1 > tmp.2
    cat tmp.2 | awk '{ print $2, $3 }' | sed 's/://g' > $file.bin

    rm tmp.1
    rm tmp.2
done

cat << EOF > gnuplotinput
set terminal png size 640,480
set output "plot.png"
set xlabel "iteration"
set ylabel "microseconds"
set xrange [0:45e5]
plot \\
EOF

for file in $@; do
    echo "\"$file.bin\" using 1:2 with boxes title \"$file\", \\" >> gnuplotinput
done

gnuplot gnuplotinput
rm gnuplotinput
Result for system with tuned BIOS on normal kernel looks like this:
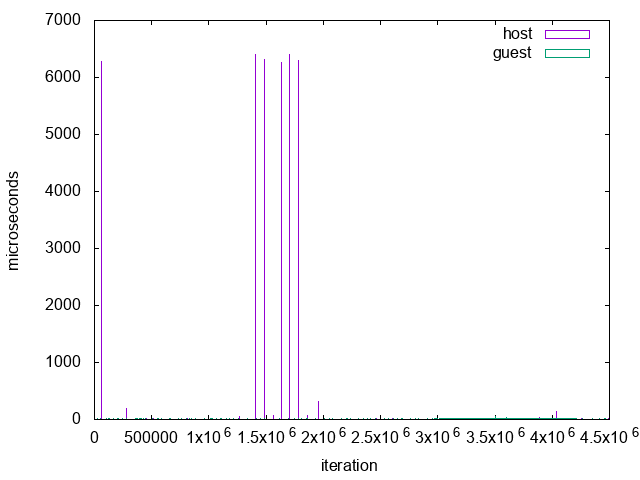
We can see multiple ~6 ms spikes, orders of magnitude above expected latency window.
Host OS Setup
To prepare the system for RT kernel, additional configuration needs to be done. First, VDSM (the oVirt’s host agent) normally requires dm-multipath for it’s multipath capabilities. Unfortunately this leads to kernel panic on kernel 3.10.0-506.rt56.411.el7.x86_64. To work around the panic, we can disable (blacklist is not enough) the module:
$ cat /etc/modprobe.d/disable-dm-multipath.conf
install dm-multipath /bin/false
Now we can install RT kernel and KVM:
$ yum groupinstall RT
$ yum install kernel-rt-kvm
We will also need a hook to disable all virtio devices (except NIC) for VMs running on the host. This step is required as virtio may lead to unexpected latency spikes.
#!/usr/bin/python

import sys
import hooking

domxml = hooking.read_domxml()
video = domxml.getElementsByTagName('video')[0]
video.parentNode.removeChild(video)
graphics = domxml.getElementsByTagName('graphics')[0]
graphics.parentNode.removeChild(graphics)
channels = domxml.getElementsByTagName('channel')
for channel in channels:
        channel.parentNode.removeChild(channel)
hooking.write_domxml(domxml)
Next, tuned. Tuned is a “dynamic adaptive system tuning daemon” allowing us to specify a profile for system to use. Luckily, tuned already has a “realtime” profile that we only need to activate and disable the dynamic part of tuned (as we require the real-time operation for the runtime).
$ tuned-adm profile realtime

$ grep dynamic_tuning /etc/tuned/tuned-main.conf
dynamic_tuning = 0
Before rebooting into our new and fancy RT environment, there is one more step to be done. We have to isolate few CPUs for our RT VMs. Since 4.0, oVirt has a feature that allows modifying kernel command line from it’s UI – navigate to Hosts→(select host)→Edit→Kernel. You should be presented with screen similar to the one below.
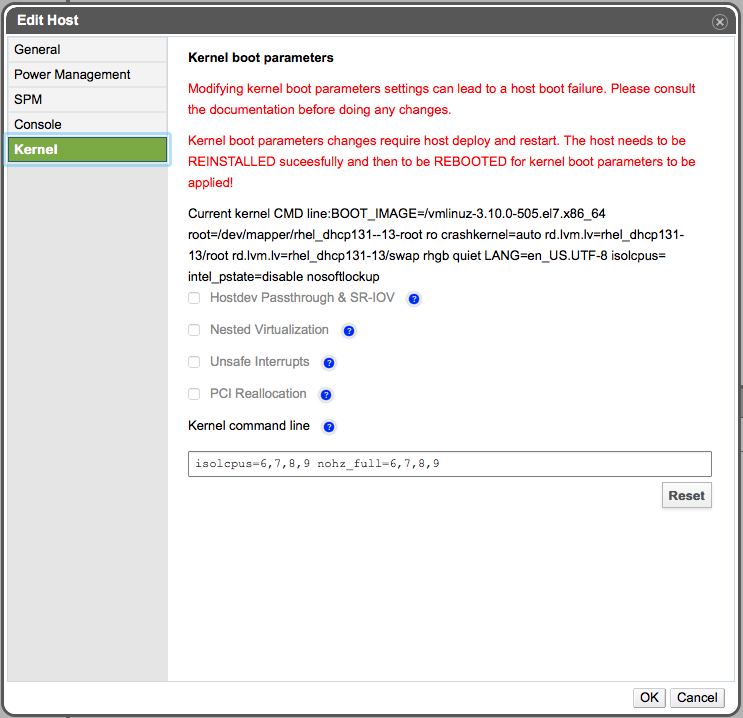
Notice the free-entry text field with two new parameters: isolcpus=6,7,8,9 and nohz_full=6,7,8,9.
These parameters allow us to isolate given CPUs (in our case it’s CPUs 6, 7, 8 and 9) so that the kernel doesn’t schedule anything onto them and avoids scheduling-clock ticks against these CPUs.
After reinstalling the host from within oVirt (Installation→Reinstall) the command line should be modified. We can now reboot and select correct kernel when booting up.
Unfortunately, there is a small issue within VDSM.
vdsm root ERROR kernel build time not found
Traceback (most recent call last):
    File "/usr/lib/python2.7/site-packages/vdsm/osinfo.py", line 192, in kernelDict
    t = time.mktime(time.strptime(' '.join(t)))
    File "/usr/lib64/python2.7/_strptime.py", line 467, in _strptime_time
    return _strptime(data_string, format)[0]
    File "/usr/lib64/python2.7/_strptime.py", line 325, in _strptime
    (data_string, format))
ValueError: time data 'PREEMPT RT Tue Sep 14:38:12 EDT 2016' does not match format '%a %b %d %H:%M:%S %Y'
VDSM cannot handle RT kernel’s different format of compile time. The simplest hack we can do is simply not reporting it.
diff --git a/usr/lib/python2.7/site-packages/vdsm/osinfo.py.orig b/usr/lib/python2.7/site-package
index 3c6ab3b..ced8946 100644
--- a/usr/lib/python2.7/site-packages/vdsm/osinfo.py.orig
+++ b/usr/lib/python2.7/site-packages/vdsm/osinfo.py
@@ -189,7 +189,8 @@ def package_versions():
         try:
             t = ret[3].split()[2:]
             del t[4]  # Delete timezone
-            t = time.mktime(time.strptime(' '.join(t)))
+            t = '0'
+            #t = time.mktime(time.strptime(' '.join(t)))
         except ValueError:
             logging.error('kernel build time not found', exc_info=True)
             t = '0'
VM Setup
We’re getting close! It’s time to create a VM and configure it as our RT guest. The configuration can be mostly left default. Let’s assume we want 4 vCPUs (as 4 sockets) and 4 GiB of RAM. Our most important stop is in Resource Allocation tab. The VM must be pinned to some of our isolated CPUs. As we have isolated CPUs 6, 7, 8, 9, with this being the only VM to run on the host, we may pin each vCPU to pCPU in a 1:1 fashion. Below is a screenshot of Resource Allocation tab in oVirt that allows CPU pinning.
Guest OS tuned should be configured in the same fashion as host OS (activate realtime profile and disable dynamic_tuning).
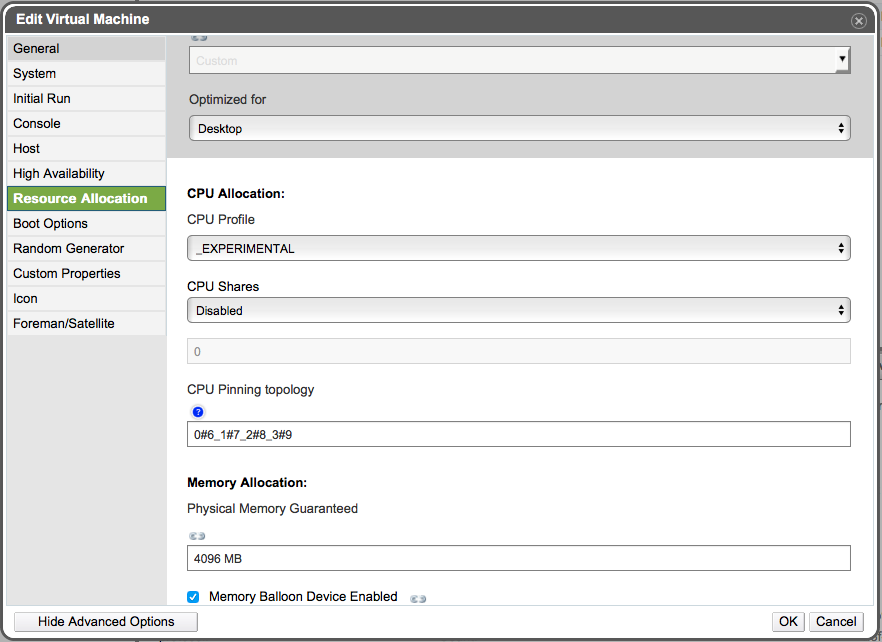
The topology used is 0#6_1#7_2#8_3#9.
The syntax translates to
- pin vCPU 0 to pCPU 6,
- pin vCPU 1 to pCPU 7,
- pin vCPU 2 to pCPU 8,
- pin vCPU 3 to pCPU 9.
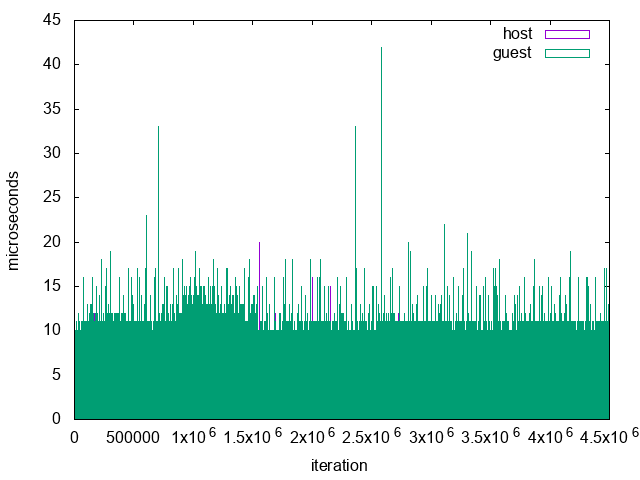
Conclusions
The results of cyclictest of host & guest are plotted below. We can see that the latency is less spiky, ranging from 10 µs to 40 µs. Since the cyclictest ran only for 15 minutes, we can’t conclude that the system is 100 % RT. On the other hand, this PoC serves as a proof that oVirt can run RT host without any critical issues.