Proof of concept Kubernetes cluster on Raspberry Pi using K3s
27 Sep 2020The project
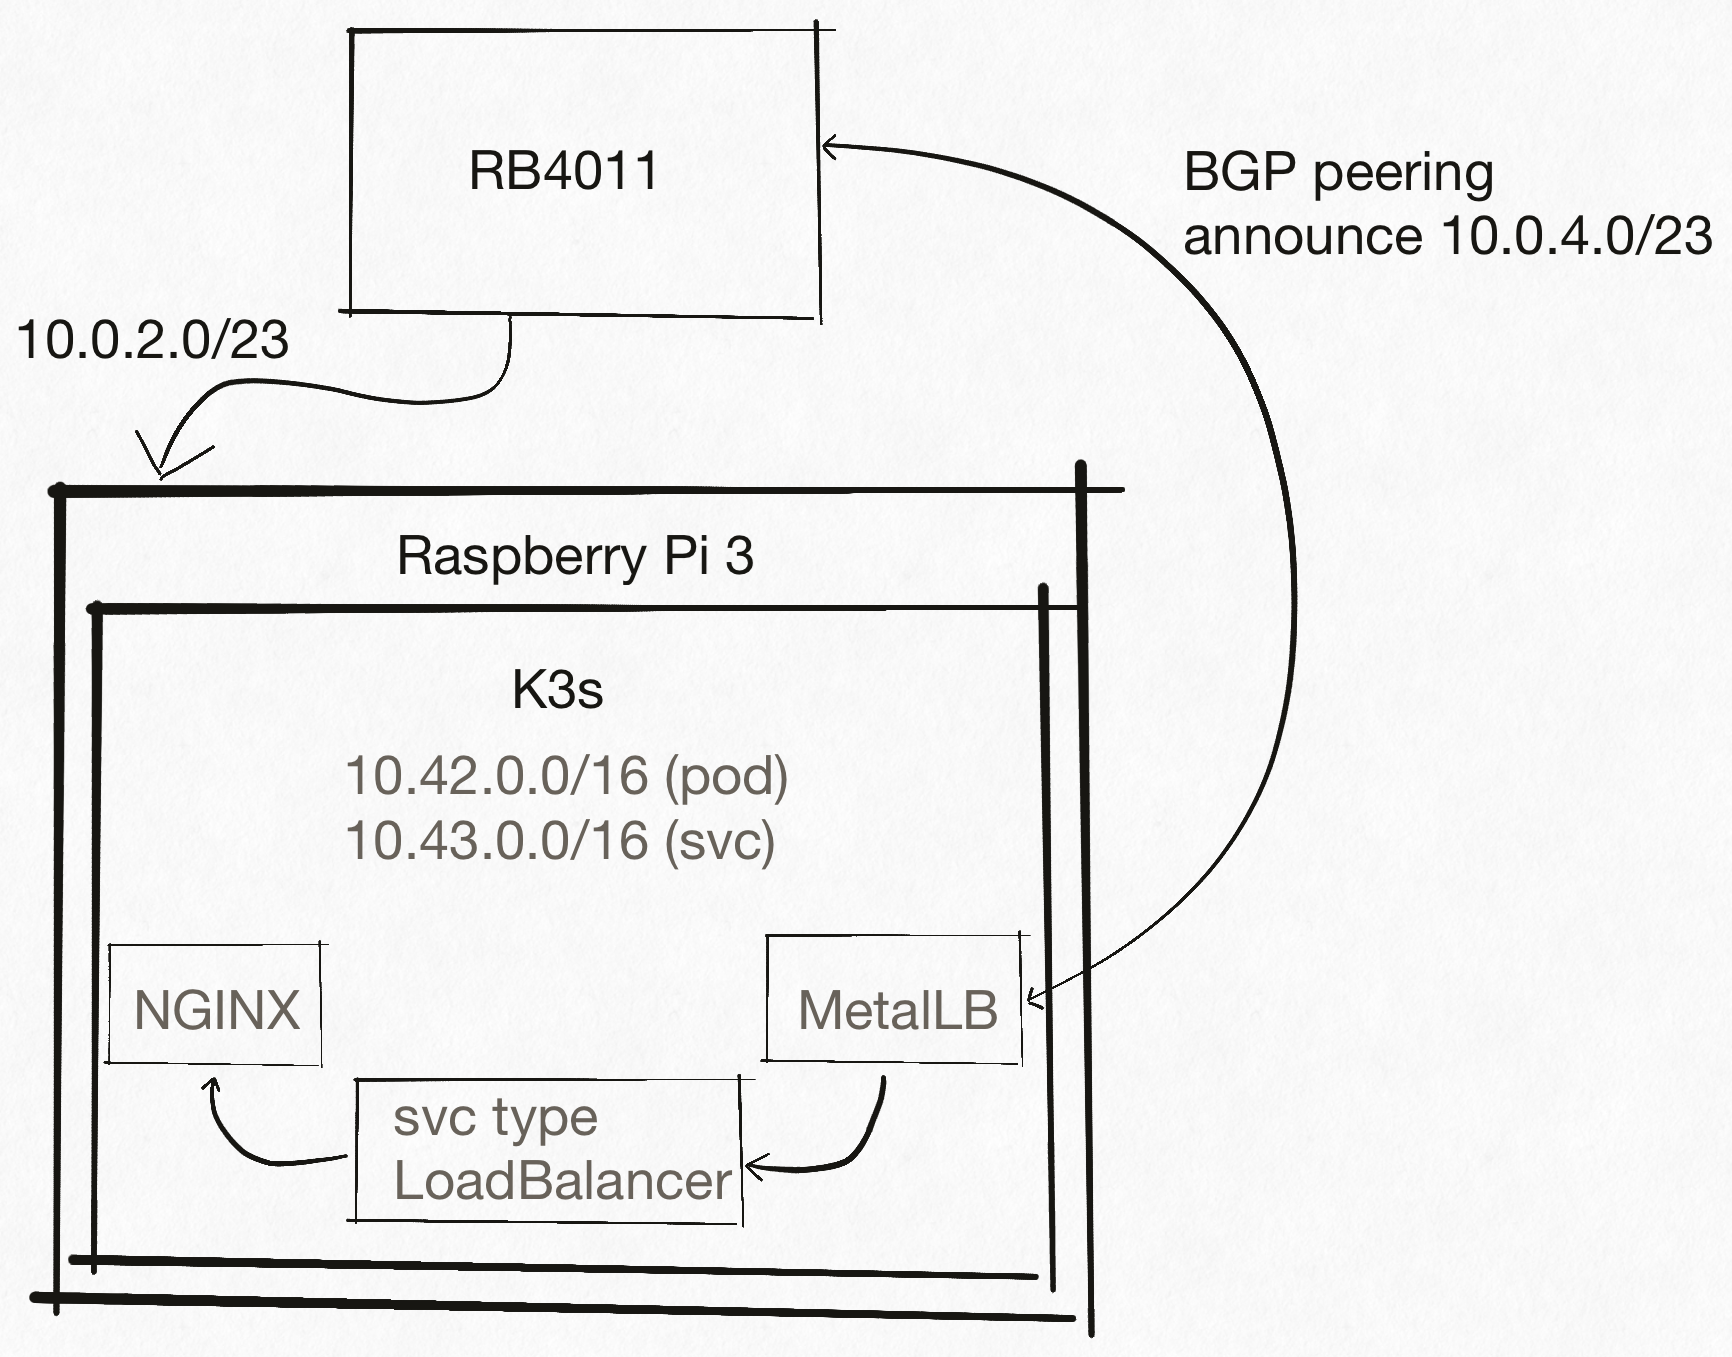
The plan is somewhat simple here: we’ll try to setup a proof of concept Kubernetes cluster in homelab environment with a twist: service announcement over BGP.
The hardware
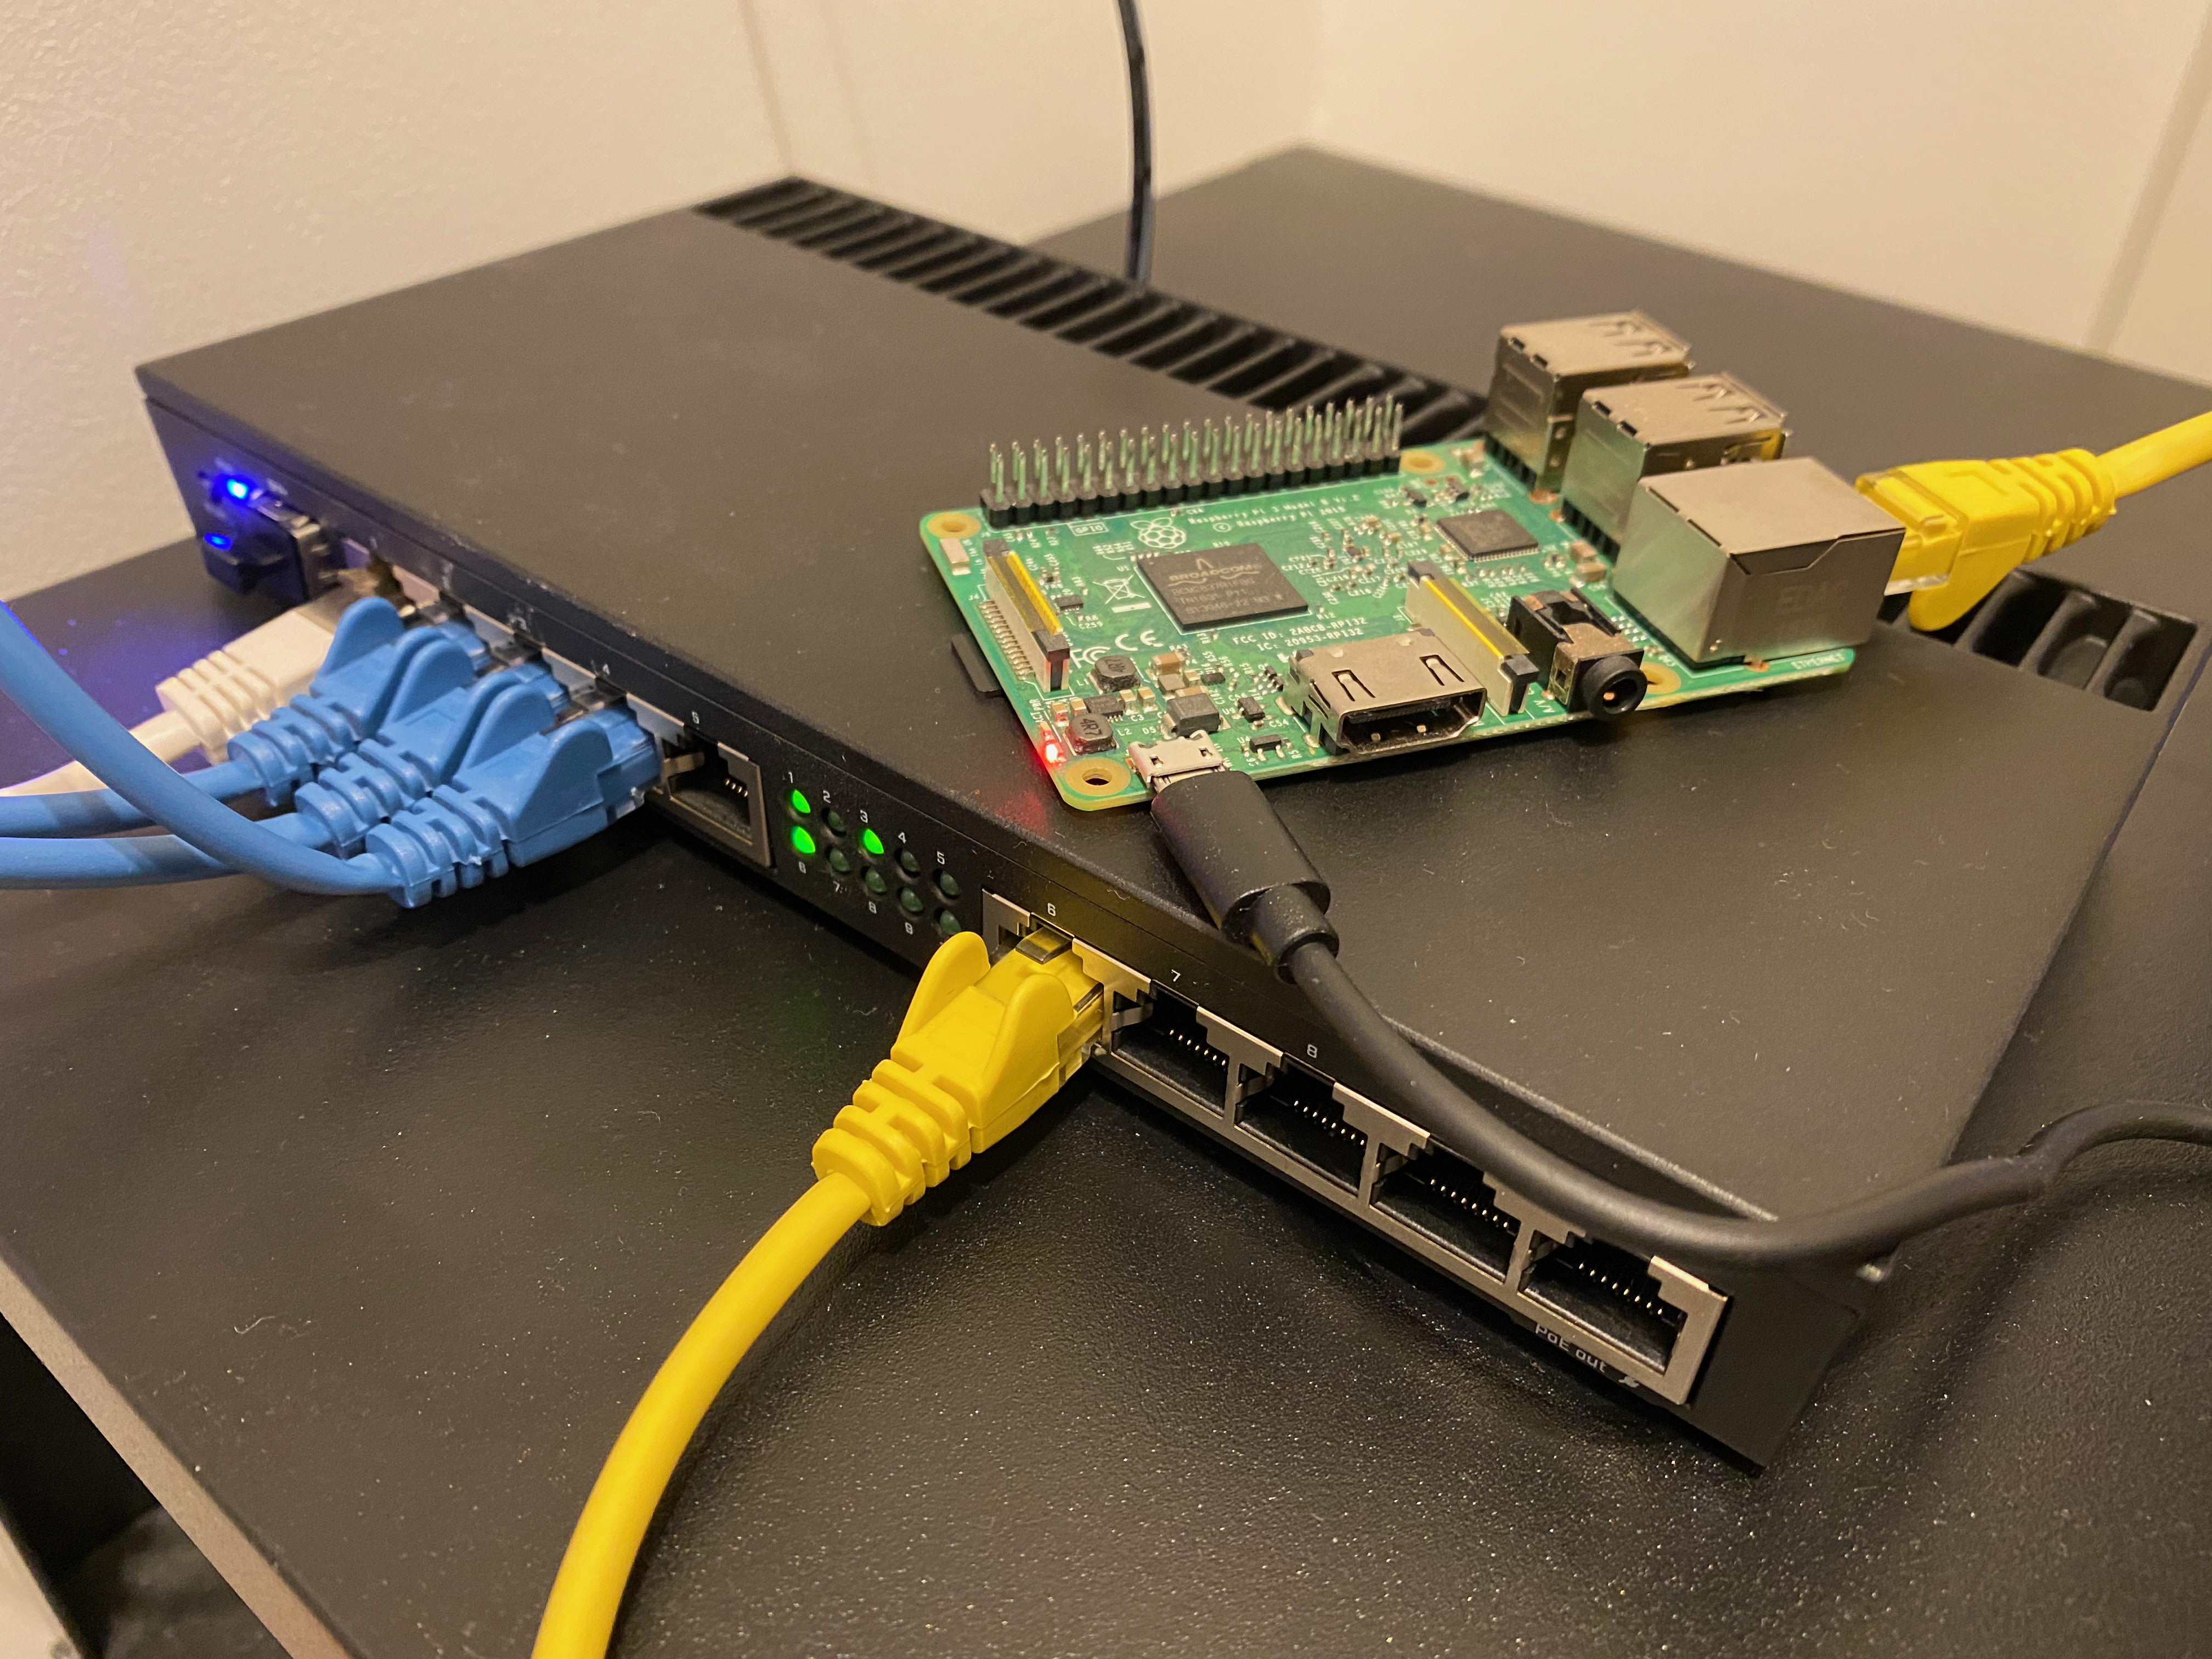
You’ll need several pieces of hardware at this stage. I’ve tried this with a Raspberry Pi version 3 model B and feel that the Pi didn’t manage the load well at times - version 4 might be a bit better idea.
The Mikrotik RB4011 router is a great choice for this project as it comes with 10 gigabit RJ45 switch ports (on 2 separate switch chips), great OS (RouterOS) and more capabilities than one can even dream of utilizing. That being said, it’s an overkill. Any router that speaks BGP is sufficient, but the snippets console in this post are from MikroTik’s RouterOS.
- Mikrotik RB4011, an ethernet router that, among other features, speaks BGP
- Raspberry Pi 3 Model B
- MicroSD card (8 GiB seems enough),
- MicroSD card write-capable device
- power adapter suitable for the Pi
- ethernet cable
Setting up the network infrastructure
We’ll bridge ports 6 through 10 (1 is used for WAN, 2-5 for home network) and create a new subnet where the project will take place. Why 5 ports for 1 Pi? At this point, it’s just a convenience of being able to plug it into any of the 5 ports and be on the correct network. Starting at layer 2:
/interface bridge
add name=bridge2
/interface bridge port
add bridge=bridge2 interface=ether6
add bridge=bridge2 interface=ether7
add bridge=bridge2 interface=ether8
add bridge=bridge2 interface=ether9
add bridge=bridge2 interface=ether10
Next, we move over to L3 tasks. Home lab will initially be assigned the 10.0.2.0/23 subnet, and the router will be at 10.0.2.1. This is an important piece of information that we’ll need when setting up BGP.
/ip address
add address=10.0.2.1/23 interface=bridge2 network=10.0.2.0
Then we probably want a DHCP server. The 10.0.2.0/24 portion of the subnet will be reserved for static IPs, and DHCP will only distribute addresess in 10.0.3.0/24 range. The split exists because it scales to more complex scenarios in the future, we won’t need to touch the static space except for the router.
/ip pool
add name=lab-pool ranges=10.0.3.1-10.0.3.254
/ip dhcp-server network
add address=10.0.2.0/23 dns-server=8.8.8.8,8.8.4.4 gateway=10.0.2.1
/ip dhcp-server
add address-pool=lab-pool disabled=no interface=bridge2 name=dhcp2
Preparing the Raspberry Pi (on MacOS)
We need some OS. At this point, experimenting with ARM64 is a needless overhead. The same applies to any non-standard OS. The path of least resistance seems to be Raspberry Pi OS (previously called raspbian).
$ wget https://downloads.raspberrypi.org/raspios_lite_armhf_latest \
    --trust-server-names \
    --timestamping
$ unzip 2020-08-20-raspios-buster-armhf-lite.zip
Since the DHCP server is under our control (running on RB4011), it is acceptable for the Pi to obtain a DHCP lease. We’ll then find the IP directly within the DHCP server’s interface. There is no expectation that a screen will ever be connected to the Pi, and Raspberry Pi OS does not ship with SSH enabled by default. Can we somehow enable it before at this stage?
According to the
docs, the OS
looks for a file named ssh in the boot directory. If found, the OS will boot
up with SSH enabled (using default pi username and raspberry password).
$ open 2020-08-20-raspios-buster-armhf-lite.img
$ cd /Volumes/boot
$ touch ssh
$ diskutil unMount /Volumes/boot
We then need to get the modified image to MicroSD card used as our main system disk. Since Apple hardware no longer ships with (Micro)SD card reader, an external reader is our only choice.
First, let’s figure out which device is the SD card using diskutil command:
$ diskutil list
...

/dev/disk3 (external, physical):
   #:                       TYPE NAME                    SIZE       IDENTIFIER
   0:     FDisk_partition_scheme                        *7.9 GB     disk3
   1:             Windows_FAT_32 boot                    268.4 MB   disk3s1
   2:                      Linux                         7.7 GB     disk3s2
Double check the parameters of the device - writing to a wrong device would
lead to catastrophic consequences. In order to speed up the process, we want
to write to the raw device (/dev/rdiskN) instead of the buffered /dev/diskN
variant.
$ sudo diskutil unmountDisk /dev/disk3
$ sudo dd if=~/2020-08-20-raspios-buster-armhf-lite.img of=/dev/rdisk3 bs=4m
$ sudo diskutil eject /dev/rdisk3
After ejecting the logical device, it’s time to get on the hardware level and plug the card into the Raspberry Pi. Continuing on the hardware front, we plug the Pi into any of the bridged router ports (6-10) and connect a power adapter.
First test!
The Pi should boot up and obtain a DHCP lease. Let’s consult the router. The output is modified to hide any other leases and hwaddr.
/ip dhcp-server lease p
...
 1 D 10.0.3.254 B8:27:EB:00:00:00 rpi dhcp2 bound
...
That means we should be able to reach our Pi via SSH:
$ ssh pi@10.0.3.254
pi@10.0.3.254's password:
Linux k8s-master 5.4.51-v7+ #1333 SMP Mon Aug 10 16:45:19 BST 2020 armv7l

...

pi@rpi:~ $
Success! We’re in, and it’s time to install Kubernetes. The flavor of Kubernetes of choice is k3s (GitHub link). K3s is pretty popular (at least according to the 15k GitHub as of Sep. 2020) minimal Kubernetes distribution from Rancher. For this project, the main value propostion of k3s is a minimal resource usage and also high quality developer tools.
Naively reading the k3s docs, it seems that all we need is to run single curl
command and pipe that into shell. As a root. Sounds very safe, but it’s an
experiment - so why not. :) Also note that Pi was renamed to k8s-master.
root@k8s-master:/home/pi# curl -sfL https://get.k3s.io | sh -
[INFO]  Finding release for channel stable
[INFO]  Using v1.18.9+k3s1 as release
[INFO]  Downloading hash https://github.com/rancher/k3s/releases/download/v1.18.9+k3s1/sha256sum-arm.txt
[INFO]  Downloading binary https://github.com/rancher/k3s/releases/download/v1.18.9+k3s1/k3s-armhf
[INFO]  Verifying binary download
[INFO]  Installing k3s to /usr/local/bin/k3s
[INFO]  Creating /usr/local/bin/kubectl symlink to k3s
[INFO]  Creating /usr/local/bin/crictl symlink to k3s
[INFO]  Creating /usr/local/bin/ctr symlink to k3s
[INFO]  Creating killall script /usr/local/bin/k3s-killall.sh
[INFO]  Creating uninstall script /usr/local/bin/k3s-uninstall.sh
[INFO]  env: Creating environment file /etc/systemd/system/k3s.service.env
[INFO]  systemd: Creating service file /etc/systemd/system/k3s.service
[INFO]  systemd: Enabling k3s unit
Created symlink /etc/systemd/system/multi-user.target.wants/k3s.service → /etc/systemd/system/k3s.service.
[INFO]  systemd: Starting k3s
root@k8s-master:/home/pi#
Wow, at this point it’s worth noting that k3s project kept the promise of “convenient way to download K3s and add a service to systemd or openrc”. Did we really manage to install Kubernetes (ARM even!) with one command?!
root@k8s-master:/home/pi# kubectl get pods --all-namespaces
NAMESPACE     NAME                                     READY   STATUS              RESTARTS   AGE
kube-system   helm-install-traefik-jstv5               0/1     ContainerCreating   0          65s
kube-system   local-path-provisioner-6d59f47c7-7r5kr   0/1     ContainerCreating   0          63s
kube-system   metrics-server-7566d596c8-xb8mg          0/1     ContainerCreating   0          63s
kube-system   coredns-7944c66d8d-9w9lk                 0/1     ContainerCreating   0          63s
It does seem to be the case. That being said, the Pi isn’t managing the load exactly well. It’s time to order few Pi 4s as cluster slowly boots up.
top - 16:45:07 up  4:57,  1 user,  load average: 7.37, 3.57, 1.82
Tasks: 168 total,   2 running, 166 sleeping,   0 stopped,   0 zombie
%Cpu0  :  25.6/8.4    34[||||||||||||||||||||||||||||||||||                                                                  ]
%Cpu1  :  37.3/6.0    43[|||||||||||||||||||||||||||||||||||||||||||                                                         ]
%Cpu2  :  54.5/2.4    57[|||||||||||||||||||||||||||||||||||||||||||||||||||||||||                                           ]
%Cpu3  :  68.1/4.0    72[||||||||||||||||||||||||||||||||||||||||||||||||||||||||||||||||||||||||                            ]
MiB Mem :    925.9 total,     21.9 free,    474.7 used,    429.2 buff/cache
MiB Swap:    100.0 total,     79.2 free,     20.8 used.    394.3 avail Mem
As few minutes pass, this is what we get:
root@k8s-master:/home/pi# kubectl get pods --all-namespaces
NAMESPACE     NAME                                     READY   STATUS      RESTARTS   AGE
kube-system   local-path-provisioner-6d59f47c7-7r5kr   1/1     Running     0          2m53s
kube-system   metrics-server-7566d596c8-xb8mg          1/1     Running     0          2m53s
kube-system   coredns-7944c66d8d-9w9lk                 1/1     Running     0          2m53s
kube-system   helm-install-traefik-jstv5               0/1     Completed   0          2m55s
kube-system   svclb-traefik-7wwmr                      2/2     Running     0          62s
kube-system   traefik-758cd5fc85-kbbnr                 1/1     Running     0          64s
I’m not exactly happy about the choice of Traefik (but that’s almost a material for another post), but let’s consider that acceptable for now. It’s time to get MetalLB up and try to advertise a service over BGP. Since we lack any automation on the router side, we need to prepare the router to peer with our MetalLB instance:
/routing bgp peer
add name=peer1 remote-address=10.0.3.254 remote-as=64500 ttl=default
Let’s see how MetalLB setup goes!
kubectl apply -f https://raw.githubusercontent.com/metallb/metallb/v0.9.3/manifests/namespace.yaml
kubectl apply -f https://raw.githubusercontent.com/metallb/metallb/v0.9.3/manifests/metallb.yaml
kubectl create secret generic -n metallb-system memberlist --from-literal=secretkey="$(openssl rand -base64 128)"
MetalLB also requires a configmap that configures BGP peers and address pools for service allocation. The used pool should be outside of the DHCP range to avoid possibly conflicts. Our choice is therefore 10.0.4.0/23 as that subnet happens to be unused in our network.
$ cat << EOF > metallb-cm.yaml
apiVersion: v1
kind: ConfigMap
metadata:
  namespace: metallb-system
  name: config
data:
  config: |
    peers:
    - peer-address: 10.0.2.1
      peer-asn: 65530
      my-asn: 64500
    address-pools:
    - name: default
      protocol: bgp
      avoid-buggy-ips: true
      addresses:
      - 10.0.4.0/23
EOF
$ kubectl apply -f metallb-cm.yaml
configmap/config created
After setting everything up, it’s time to create a service type LoadBalancer and see if MetalLB is able to advertise the IP. Actually, wait a second. Since there is a Traefik in the cluster, don’t we already have one LoadBalancer service?
root@k8s-master:/home/pi# kubectl get svc --all-namespaces
NAMESPACE     NAME                 TYPE           CLUSTER-IP      EXTERNAL-IP   PORT(S)                      AGE
default       kubernetes           ClusterIP      10.43.0.1       <none>        443/TCP                      9m55s
kube-system   kube-dns             ClusterIP      10.43.0.10      <none>        53/UDP,53/TCP,9153/TCP       9m51s
kube-system   metrics-server       ClusterIP      10.43.213.246   <none>        443/TCP                      9m44s
kube-system   traefik-prometheus   ClusterIP      10.43.10.242    <none>        9100/TCP                     7m45s
kube-system   traefik              LoadBalancer   10.43.168.74    10.0.3.254    80:31932/TCP,443:30621/TCP   7m44s
Uh-oh. On the positive side, we do happen to have a LoadBalancer service. On the other hand, 10.0.3.254 certainly doesn’t belong to our pool - 10.0.4.0/23. What went wrong?
$ /routing bgp peer p
Flags: X - disabled, E - established
 #   INSTANCE                                               REMOTE-ADDRESS                                                                         REMOTE-AS
 0 E default                                                10.0.3.254                                                                             64500
MetalLB managed to peer with the router successfully. Checking the speaker logs…
$ kubectl logs -n metallb-system speaker-96mxn --tail 100
...
{"caller":"main.go:267","event":"startUpdate","msg":"start of service update","service":"kube-system/traefik","ts":"2020-09-27T15:54:55.90341073Z"}
{"caller":"main.go:293","error":"assigned IP not allowed by config","ip":"10.0.3.254","msg":"IP allocated by controller not allowed by config","op":"setBalancer","service":"kube-system/traefik","ts":"2020-09-27T15:54:55.903652343Z"}
{"caller":"main.go:369","event":"serviceWithdrawn","ip":"","msg":"withdrawing service announcement","reason":"ipNotAllowed","service":"kube-system/traefik","ts":"2020-09-27T15:54:55.903869425Z"}
{"caller":"main.go:294","event":"endUpdate","msg":"end of service update","service":"kube-system/traefik","ts":"2020-09-27T15:54:55.903962654Z"}
...
There seems to be a process interferring with what MetalLB controller attempts to do, and the external IP toggles between node IP and our advertised IP.
$ /routing prefix-lists> /ip route p
Flags: X - disabled, A - active, D - dynamic, C - connect, S - static, r - rip, b - bgp, o - ospf, m - mme, B - blackhole, U - unreachable, P - prohibit
 #      DST-ADDRESS        PREF-SRC        GATEWAY            DISTANCE
 ...
 3 ADb  10.0.4.1/32                        10.0.3.254               20
 ...
The router also accepted the route, so what went wrong? Digging into the k3s
docs,
it’s apparent that k3s ships with some form of a LoadBalancer controller.
Luckily, the docs mention that this is an optional component that can be
disabled with --disable servicelb, perfect! The doc also mentions that it’s
possible to disable Traefik with --disable traefik, so let’s try to combine
these two and see where we get. It’s again time to appreciate how powerful
tools k3s ships with. There’s a script to uninstall everything and start from
scratch!
$ k3s-uninstall.sh
Second attempt, now without Traefik and ServiceLB
With our newly obtained knowledge, let’s get k3s up and running without the components we don’t want:
curl -sfL https://get.k3s.io | sh -s - --disable traefik --disable servicelb
And after few minutes, this is what we get:
NAMESPACE     NAME                                     READY   STATUS    RESTARTS   AGE
kube-system   metrics-server-7566d596c8-pdz8w          1/1     Running   0          73s
kube-system   local-path-provisioner-6d59f47c7-t5c8v   1/1     Running   0          73s
kube-system   coredns-7944c66d8d-wj4pw                 1/1     Running   0          73s
Perfect, a minimal cluster! Lack of Traefik also means that there is no pre-allocated LoadBalancer service. Let’s start by deploying NGINX ingress controller with a service type LoadBalancer to see if we’re able to obtain an external IP for the service. Since NGINX controller for bare-metal ships with a NodePort service by default, we need to do the necessary change from NodePort to LoadBalancer.
$ wget https://raw.githubusercontent.com/kubernetes/ingress-nginx/controller-v0.35.0/deploy/static/provider/baremetal/deploy.yaml
$ sed -i 's/NodePort/LoadBalancer/' deploy.yaml
$ kubectl apply -f deploy.yaml
namespace/ingress-nginx created
serviceaccount/ingress-nginx created
configmap/ingress-nginx-controller created
clusterrole.rbac.authorization.k8s.io/ingress-nginx created
clusterrolebinding.rbac.authorization.k8s.io/ingress-nginx created
role.rbac.authorization.k8s.io/ingress-nginx created
rolebinding.rbac.authorization.k8s.io/ingress-nginx created
service/ingress-nginx-controller-admission created
service/ingress-nginx-controller created
deployment.apps/ingress-nginx-controller created
validatingwebhookconfiguration.admissionregistration.k8s.io/ingress-nginx-admission created
serviceaccount/ingress-nginx-admission created
clusterrole.rbac.authorization.k8s.io/ingress-nginx-admission created
clusterrolebinding.rbac.authorization.k8s.io/ingress-nginx-admission created
role.rbac.authorization.k8s.io/ingress-nginx-admission created
rolebinding.rbac.authorization.k8s.io/ingress-nginx-admission created
job.batch/ingress-nginx-admission-create created
job.batch/ingress-nginx-admission-patch created
It’s time to check the state of the LoadBalancer service:
$ kubectl get svc -n ingress-nginx
NAME                                 TYPE           CLUSTER-IP      EXTERNAL-IP   PORT(S)                      AGE
ingress-nginx-controller-admission   ClusterIP      10.43.104.173   <none>        443/TCP                      18s
ingress-nginx-controller             LoadBalancer   10.43.136.0     <pending>     80:31657/TCP,443:31381/TCP   18s
Repeating this for a few times while also checking the logs, it doesn’t seem that there is anything to assign the IP. That is expected - we disabled the ServiceLB component of k3s. Time to try MetalLB again!
$ kubectl apply -f https://raw.githubusercontent.com/metallb/metallb/v0.9.3/manifests/namespace.yaml
$ kubectl apply -f https://raw.githubusercontent.com/metallb/metallb/v0.9.3/manifests/metallb.yaml
$ kubectl create secret generic -n metallb-system memberlist --from-literal=secretkey="$(openssl rand -base64 128)"
$ cat << EOF > metallb-cm.yaml
apiVersion: v1
kind: ConfigMap
metadata:
  namespace: metallb-system
  name: config
data:
  config: |
    peers:
    - peer-address: 10.0.2.1
      peer-asn: 65530
      my-asn: 64500
    address-pools:
    - name: default
      protocol: bgp
      avoid-buggy-ips: true
      addresses:
      - 10.0.4.0/23
EOF
$ kubectl apply -f metallb-cm.yaml
After a while, the BGP peering is seen as established on the router side.
$ /routing bgp peer p
Flags: X - disabled, E - established
 #   INSTANCE                                               REMOTE-ADDRESS                                                                         REMOTE-AS
 0   default                                                10.0.3.254                                                                             64500
And MetalLB controller has assigned an IP address to the service!
$ kubectl get svc -n ingress-nginx
NAME                                 TYPE           CLUSTER-IP      EXTERNAL-IP   PORT(S)                      AGE
ingress-nginx-controller-admission   ClusterIP      10.43.104.173   <none>        443/TCP                      10m
ingress-nginx-controller             LoadBalancer   10.43.1.19      10.0.4.1      80:30579/TCP,443:31078/TCP   100s
Hello world!
It’s time to see if BGP route advertisement really worked and we can reach the service from the home network (assuming that the firewall configurations permits that).
$ curl -vvv 10.0.4.1
*   Trying 10.0.4.1...
* TCP_NODELAY set
* Connected to 10.0.4.1 (10.0.4.1) port 80 (#0)
> GET / HTTP/1.1
> Host: 10.0.4.1
> User-Agent: curl/7.64.1
> Accept: */*
>
< HTTP/1.1 404 Not Found
< Server: nginx/1.19.2
< Date: Sun, 27 Sep 2020 16:21:20 GMT
< Content-Type: text/html
< Content-Length: 153
< Connection: keep-alive
<
<html>
<head><title>404 Not Found</title></head>
<body>
<center><h1>404 Not Found</h1></center>
<hr><center>nginx/1.19.2</center>
</body>
</html>
* Connection #0 to host 10.0.4.1 left intact
* Closing connection 0
$ /ip route> /ip route p
Flags: X - disabled, A - active, D - dynamic, C - connect, S - static, r - rip, b - bgp, o - ospf, m - mme, B - blackhole, U - unreachable, P - prohibit
 #      DST-ADDRESS        PREF-SRC        GATEWAY            DISTANCE
...
 3 ADb  10.0.4.1/32                        10.0.3.254               20
...
Perfect! Although the server returns 404, the Server header hints that we’ve
reached the NGINX. Any cluster service can now be exposed via the Ingress
resource.
And that’s it for the day! The Raspberry Pi 3 B is somewhat overloaded, so it’s time to wait for Pi version 4 to arrive before experimenting further. All in all, this has been a great experience with K3s distribution - the ease of setup for project like this is perfect.